Chocolate Maritozzi Recipe
Introduction
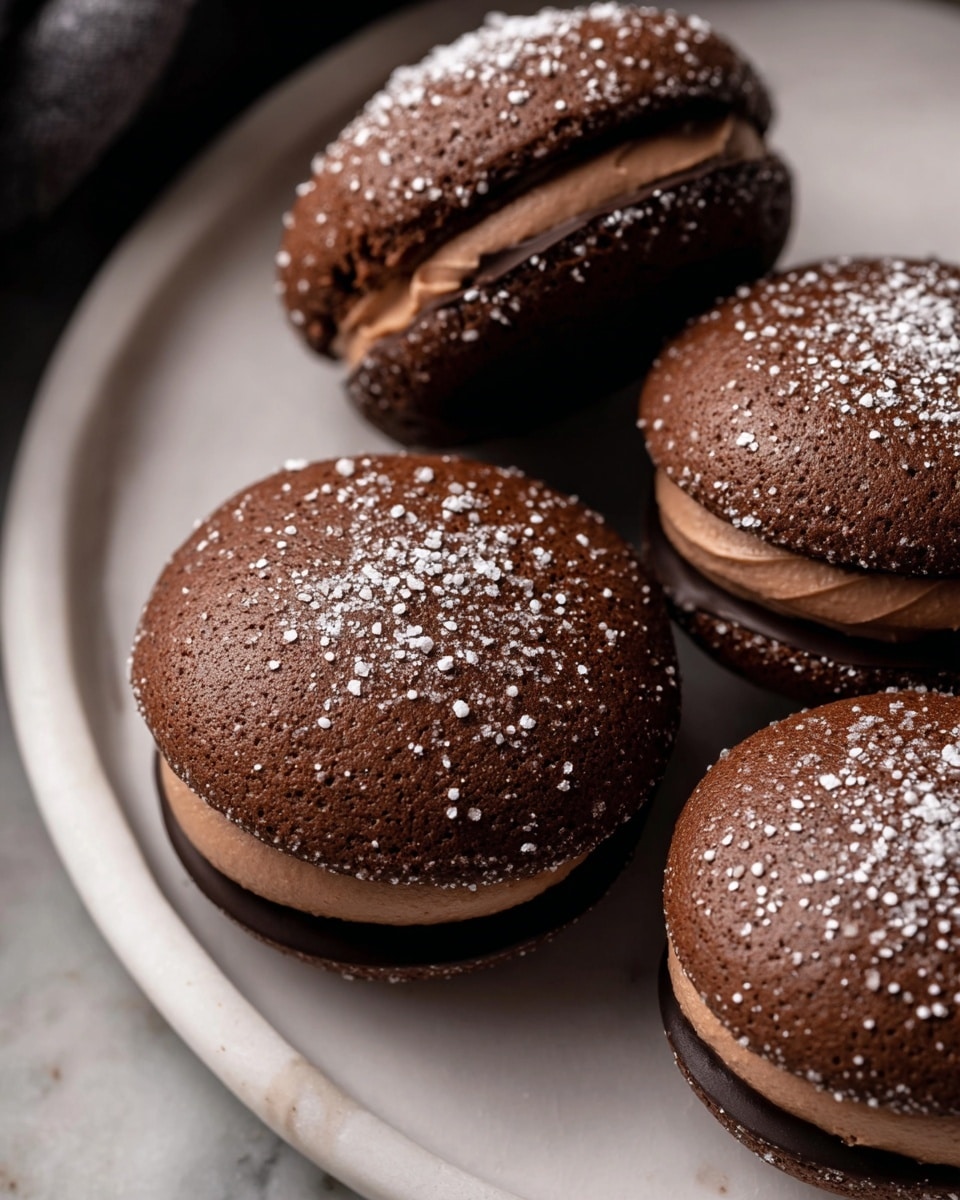
Chocolate Maritozzi are soft, sweet Italian buns filled with rich cocoa whipped cream. Perfect as a decadent breakfast treat or afternoon snack, these fluffy buns offer a delightful balance of chocolate flavor and creamy filling.
Ingredients
- 250 g All-purpose flour (2 cups + 2 tbsp)
- 240 g Bread flour (2 cups)
- 2½ tsp Instant yeast
- 75 g Granulated sugar (generous ⅓ cup)
- 1 tsp Salt
- ½ tbsp Vanilla extract
- 2 large Eggs, room temperature
- 240 g Whole or 2% milk (1 cup, warm ~95°F)
- ¼ cup Neutral oil (Vegetable or Canola)
- 28 g Dutch process cocoa powder (¼ cup)
- Egg Wash:
- 1 large Egg
- 1 tbsp Whole or 2% milk
- Whipped Cream Filling:
- 2 cups Heavy whipping cream, cold
- ⅔ cup Powdered sugar, sifted
- 4 tbsp Cocoa powder, sifted
- Pinch of salt
Instructions
- Step 1: Combine all dough ingredients in the bowl of a stand mixer fitted with a dough hook. Knead on low speed until the dough is smooth but still slightly sticky, sticking to the bottom of the bowl.
- Step 2: Place the dough in a lightly greased bowl, cover, and let it rise for 1 to 2 hours until doubled in size.
- Step 3: Line a baking sheet with parchment paper and set aside.
- Step 4: Turn the dough out onto a work surface. Divide into 8 to 12 equal pieces using a knife or bench cutter. Shape each piece into a ball by folding the sides into the center, pinching them together, then gently rolling on the surface until smooth.
- Step 5: Place the dough balls seam side down on the prepared baking sheet. Cover and let rise for 30 minutes to 1 hour until puffed.
- Step 6: Preheat the oven to 350°F (175°C). Whisk together the egg and milk for the egg wash.
- Step 7: Brush the risen buns with the egg wash, then bake on the center rack for about 16 minutes. To check doneness, tap the bottom of a bun—it should sound hollow.
- Step 8: Transfer baked buns to a wire rack to cool completely.
- Step 9: In a bowl, whisk the cold heavy cream, sifted powdered sugar, cocoa powder, and a pinch of salt until medium-stiff peaks form. Chill the whipped cream until ready to use.
- Step 10: Once the buns are at room temperature, slice each bun lengthwise halfway through, leaving a hinge.
- Step 11: Fill the buns with the chocolate whipped cream using a piping bag or spoon. Smooth the cream evenly with a knife or offset spatula.
- Step 12: Lightly dust the tops with powdered sugar. Serve and enjoy your homemade Chocolate Maritozzi!
Tips & Variations
- Use bread flour for a chewier texture or all-purpose flour for a softer bun. A mix of both gives balance.
- You can substitute the cocoa powder in the dough with an equal amount of regular flour for a plain maritozzo filled with chocolate cream instead.
- Chill the whipped cream filling for at least 30 minutes before filling to help it hold shape better.
- If you don’t have a stand mixer, knead the dough by hand for 10-12 minutes until smooth and elastic.
Storage
Store the baked buns without filling in an airtight container at room temperature for up to 2 days or freeze for up to 1 month. If filled, keep them refrigerated and consume within 1 day. Reheat unfilled buns briefly in a warm oven before filling for best texture.
How to Serve
Serve this delicious recipe with your favorite sides.
FAQs
Can I make the dough ahead of time?
Yes, you can prepare the dough and allow it to rise slowly in the refrigerator overnight. Just bring it to room temperature before shaping.
What can I use instead of Dutch process cocoa powder?
You can use natural cocoa powder, but it may alter the flavor slightly and affect the dough’s rise due to acidity differences.
PrintChocolate Maritozzi Recipe

Delight in the rich and fluffy Chocolate Maritozzi, an Italian sweet bun filled with luscious cocoa whipped cream. These soft, chocolate-infused buns are perfect for breakfast or an indulgent snack. The dough is enriched with cocoa powder for a subtle chocolate flavor and paired with a decadent whipped cream filling, dusted with powdered sugar for a beautiful finish.
- Prep Time: 20 minutes
- Cook Time: 16 minutes
- Total Time: 2 hours 30 minutes
- Yield: 8–12 buns 1x
- Category: Bakery, Breakfast, Dessert
- Method: Baking
- Cuisine: Italian
Ingredients
Dough
- 250 g All-Purpose Flour (2 cups + 2 tbsp)
- 240 g Bread Flour (2 cups)
- 2½ tsp Instant yeast
- 75 g Granulated sugar (generous ⅓ cup)
- 1 tsp Salt
- ½ tbsp Vanilla extract
- 2 large Eggs, room temperature
- 240 g Whole or 2% milk (1 cup), warm (~95°F)
- ¼ cup Neutral oil (Vegetable or Canola)
- 28 g Dutch process cocoa powder (¼ cup)
Egg Wash
- 1 large Egg
- 1 tbsp Whole or 2% milk
Whipped Cream Filling
- 2 cups Heavy whipping cream, cold
- ⅔ cup Powdered sugar, sifted
- 4 tbsp Cocoa powder, sifted
- Pinch of salt
Instructions
- Mix and Knead Dough: In the bowl of a stand mixer fitted with a dough hook, combine all dough ingredients and knead on low speed until the dough is smooth yet slightly sticky, clinging to the bowl’s bottom but not the sides.
- First Rise: Transfer the dough to a lightly greased bowl, cover it, and let it rise in a warm place for 1-2 hours or until it doubles in size.
- Prepare Baking Sheet: Line a baking sheet with parchment paper and set aside.
- Portion and Shape Dough: Remove the risen dough and divide it into 8-12 equal pieces. Shape each piece into a smooth ball by flattening gently in your hand, folding edges to the center, pinching the seams, then rolling on the work surface until round.
- Second Rise: Place dough balls on the baking sheet seam-side down, cover them, and let rise again for 30 minutes to 1 hour until puffed.
- Preheat Oven and Prepare Egg Wash: Preheat your oven to 350°F (175°C). Whisk together one egg with a tablespoon of milk to make the egg wash.
- Brush and Bake: Once risen, brush each bun with the egg wash. Bake on the center rack for approximately 16 minutes. Since the buns are chocolate, visual browning is subtle, so test doneness by tapping the bottom—they should sound hollow.
- Cool Buns: Transfer the buns to a wire rack and cool to room temperature thoroughly before filling.
- Make Whipped Cream Filling: In a cold bowl, whisk the heavy cream with sifted powdered sugar, cocoa powder, and a pinch of salt until medium-stiff peaks form. Chill until ready to use.
- Slice and Fill Buns: Carefully slice each bun horizontally halfway down, creating a pocket without splitting the bun apart. Fill generously with the chocolate whipped cream, using a piping bag if preferred. Smooth the cream level with the top of the bun using a knife or offset spatula.
- Finish and Serve: Lightly dust the filled buns with powdered sugar and serve immediately for the best flavor and texture.
Notes
- Using a kitchen scale to portion dough ensures uniform buns but is optional.
- The dough will be somewhat sticky; avoid adding extra flour to keep buns light and tender.
- If you do not have Dutch process cocoa powder, natural cocoa powder can be used but may affect color and flavor slightly.
- Keep the whipped cream cold until serving to maintain its texture.
- These buns are best enjoyed the day they are made but can be stored in the refrigerator for up to 2 days.
- Allow buns to cool completely before filling to prevent whipped cream from melting.
Keywords: Chocolate Maritozzi, Italian sweet bun, chocolate whipped cream bun, cocoa buns, sweet breakfast bread